


I will give full credit to Mr. Hubby on this one. This was totally his idea. In our round about idea sessions about decor for Will's birthday party, he threw the idea out of some stylized stand-up cut-outs of Will's favorite Toy Story characters. And it just so happened that Hubby received a jig saw & power sander from yours truly for Christmas. I knew they would come in handy ::wink::wink::
After a trip (or two) to Homey Depot.
Here's what you'd need:
5/8" plywood
pencil
jig saw
sandpaper
paint
3/8" rope (the same rope I used for the birthday banner - We used about 75' or so for all the characters.)
finish nails
hammer
L-brackets
screws
dryer vent (for Slinky Dog's body - Hubby is so clever!)
metal screw/hooks
felt (for Slinky Dog's ear - he looks like a duck without an ear)
super awesome grandparents to watch your toddler while you work, optional


Before you know it, you'll have a lovely cut out of Woody!
After a trip (or two) to Homey Depot.
Here's what you'd need:
5/8" plywood
pencil
jig saw
sandpaper
paint
3/8" rope (the same rope I used for the birthday banner - We used about 75' or so for all the characters.)
finish nails
hammer
L-brackets
screws
dryer vent (for Slinky Dog's body - Hubby is so clever!)
metal screw/hooks
felt (for Slinky Dog's ear - he looks like a duck without an ear)
super awesome grandparents to watch your toddler while you work, optional
First, draw out your character on the plywood. We had the dude at Home Depot cut the large 8' long board down into smaller boards so it was easier to work with. This helped save us a lot of time and energy. Then get your jigsaw and get to cuttin'!


Before you know it, you'll have a lovely cut out of Woody!

Look at my Hubby. Such a super duper helper when it was pouring rain and around 50 degrees outside... Yikes! But we were out of weekends to finish, so it was now or never!
Once I was finished drawing out all of the characters on their respective boards, I was left with one board. It was supposed to be for Rex, but I sadly misjudged the space I had. Rex is one of my favorites, and I was really trying to include him any way I could, but it just wasn't happening. So...Rex got swapped for an Alien. Will loves the aliens, so I guess I would do an alien instead of Rex. I guess...
Next it was time to sand. Hubby opted to sand by hand vs with the power sander because there were just too many nooks & crannies to get into. He didn't get too crazy with the sanding. It was just enough to get rid of any splinters that might be sticking out. Word to the wise: Cut on the side you want to be the back. The side you're looking at when cutting will splinter the most.

Hubby in action!
As Hubby finished sanding each character, I was prepping the paint. We picked up the little tester tubs of paint from Home Depot. Each color was from the Disney Collection. They had the most saturated colors and were bound to have them in the colors we wanted, so that was our 1st and only stop for paint. At less than $3 a pop, it's a small price to pay. And I'm kind of excited to have these colors in my repertoire for use on some other project. They're good colors!
Buzz Lightyear - Disney - Dreams Come True
Alien - Disney - Gamma Sector Green
Woody - Disney - Deep in the Woods
Hamm - Disney - Make Believe
Slinky Dog - Disney - Muddlement


Since we got the more finished plywood, I wanted to water down the paint so that the wood grain would show through.

Rolling on the paint. Make sure you have a drip catcher underneath because if you water down the paint, it's going to be drippy.
 Hamm is done!
 Slinky is done!
 Buzz
Buzz

 Woody - He came out the best, I think.
 Alien!
We let them dry for an hour or two in the garage. Since I used watered down paint, it helped the drying time.
Next, we busted out the rope, nails, & hammers.
 Lay the rope out like so...
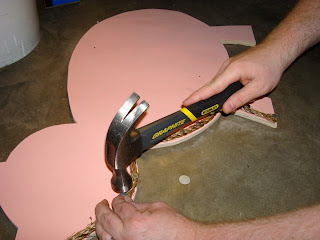 and hammer away!

Not too long later, you've got a lovely little rope/nail edge detail.
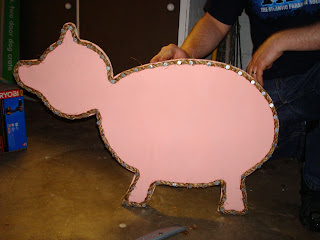 Hubby beautiful work on Hamm.
 My beautiful work on Buzz. We found that it made life easier to get the rope into those tight corners if we bent the rope back and forth a few times. Then just jam the nail in and you might need to make the nails a little closer together in those tight spots.

The last step is to attach the L-brackets to the backs of the figures. We used the small ones on the smaller characters and the large ones on Buzz & Woody.
And here's the finished product!

 Here's another angle. Since it was raining most of the morning while we were setting up for the party, we kept them on the cement, so Hubby picked up some stone bricks to weigh down the stands for a little extra security.
 Will thought they were pretty cool, too.
Not bad for an afternoon's worth of work!
Once I was finished drawing out all of the characters on their respective boards, I was left with one board. It was supposed to be for Rex, but I sadly misjudged the space I had. Rex is one of my favorites, and I was really trying to include him any way I could, but it just wasn't happening. So...Rex got swapped for an Alien. Will loves the aliens, so I guess I would do an alien instead of Rex. I guess...
Next it was time to sand. Hubby opted to sand by hand vs with the power sander because there were just too many nooks & crannies to get into. He didn't get too crazy with the sanding. It was just enough to get rid of any splinters that might be sticking out. Word to the wise: Cut on the side you want to be the back. The side you're looking at when cutting will splinter the most.

Hubby in action!
As Hubby finished sanding each character, I was prepping the paint. We picked up the little tester tubs of paint from Home Depot. Each color was from the Disney Collection. They had the most saturated colors and were bound to have them in the colors we wanted, so that was our 1st and only stop for paint. At less than $3 a pop, it's a small price to pay. And I'm kind of excited to have these colors in my repertoire for use on some other project. They're good colors!
Buzz Lightyear - Disney - Dreams Come True
Alien - Disney - Gamma Sector Green
Woody - Disney - Deep in the Woods
Hamm - Disney - Make Believe
Slinky Dog - Disney - Muddlement


Rolling on the paint. Make sure you have a drip catcher underneath because if you water down the paint, it's going to be drippy.


We let them dry for an hour or two in the garage. Since I used watered down paint, it helped the drying time.
Next, we busted out the rope, nails, & hammers.


Not too long later, you've got a lovely little rope/nail edge detail.


And here's the finished product!


Not bad for an afternoon's worth of work!
You guys rock! The cutouts were super cool and the kids loved them.
ReplyDeleteOh, wow!! I think those are so cool!! My girls love all of the Toy Story movies. They make me laugh too. What a neat way to greet your guests. :) I'm visiting from Centsational Girl's party today. Hope you'll stop by my blog to say hi! :)
ReplyDelete